Waste not want not

Having confirmed in March 2013 what we had suspected through the winter – that our colony had died, we now had a hive full of frames of wax to deal with.

I like an excuse to make things. And having successfully, but messily, extracted wax from frames using the ‘tights’ method previously (pair of old tights in an old saucepan with some water, old frames – without the wood – going into the tights, wax coming out into the water and debris getting held in the tights), I decided there had to be a less intensive way of recovering the wax.

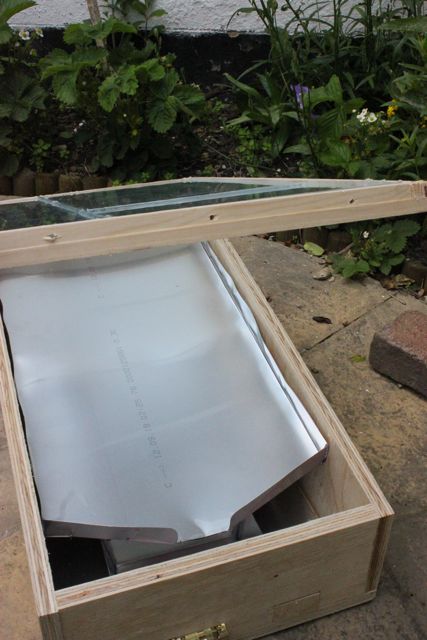
And so it was time to build a solar wax extractor. Essentially it’s a double-glazed box that will heat up in the sun, with a metal tray that the whole frame sits on, and the wax will run down to a collecting tray in the bottom. Beeswax melts at between 62 and 64 degrees celsius, so this is the temperature that you need the inside of the box to get up to.

IMG_4697

The double glazed (hinged) lid was built from some single glazed glass windows down at the allotment, cleaned up, cut to size and sealed into the frame with silicon sealant. Several beads of silicon sealant placed on the first sheet of glass keep an air gap between the two. The join that you can see is just on the top panel, and simply because I hadn’t quite got the hang of the glass cutter and managed to break the glass in the wrong place when I cut it.

There are three drainage holes in the bottom of the glazing frame, which you can see in the third picture below. This allows any moisture between the two panes to drain out – if it were totally sealed there is a risk the air in between would expand when it heated up and potentially crack the glass.

The metal sheet is an aluminium sheet, recycled from a lithographic printer. If you know where to get them, you can get them for free, but I just got it via the internet for pretty cheap. The metal attracts the suns rays, helping to heat up the box. While you could have a single glazed lid, the double glazed lid limits the extent to which the heat is lost again. In an English climate this is useful. If you live somewhere where you get more sun, single glazed would be perfectly adequate.

On a relatively shallow slope, the wax in the frame will melt and run down into the collecting container, leaving any debris behind. On a brood frame, the debris includes the papery cases in the cells, left behind by the bees as they pupated – so much so that it often looks like the wax hasn’t actually melted out, as the frame still looks like it is intact.

Some people put a mesh screen at the bottom of the tray, to filter out any further debris, but I’ve found that with a reasonably shallow slope you don’t get that much other than wax going through into the collecting container – and you can always run it through again to clean it up further.

I made this solar melter able to accommodate a single brood frame, to limit the space I’d need to store it. Of course this does mean it can take a while to deal with many frames. It obviously needs sun to make it work, and this is not always abundant in England! It can only realistically be used in summer, but on a decent day near to the solstice (and with some rotation through the day to keep up with the sun), it can melt a couple of frames, maybe 3.

IMG_4698

The latch that you see on the front of the box is holding in a piece of wood that can be removed. There is a similar one beside it (but currently without a latch), and one at the other end of the box at the top of the back panel. When melting wax, these are kept in place, as you want it to be bee-tight, and also you need to keep the heat in. In fact, I could probably do with improving the seal around these pieces to reduce heat loss when melting wax.

However, when these pieces are taken out, and with the replacement of the wax melting tray with a mesh tray, the idea is that it can be converted into a solar drier to dry fruit. The principle is that the holes (one at the top back and two at the bottom front) will encourage flow of air through the box as it heats up – hot air out through the top back and cool air drawn in through the bottom front, and this will dehydrate fruit slices or leathers. I have yet to try it – something for next summer.

IMG_4699

Having melted the wax out, we were left with the wooden frames. As some of these were covered in bee poo, and indication that our colony had probably had some nosema, it was best simply to replace these than try and reuse them. They burnt well in our clay pizza oven at the community garden on one of our pizza days. The wax and honey residues definitely helped them to catch alight!

We use the papery cases left behind from the cells in our smoker – they burn reasonably well with the little bit of wax that is left on them. It is said that the smoke from ‘slum gum’, as it is called, calms the bees. I’m not sure I notice any difference between that and any other lighter fuel we use.IMG_4557IMG_4562

And so that left us with the wax, which we turned into a variety of lip balms and body butter. IMG_4561IMG_5089 IMG_5093
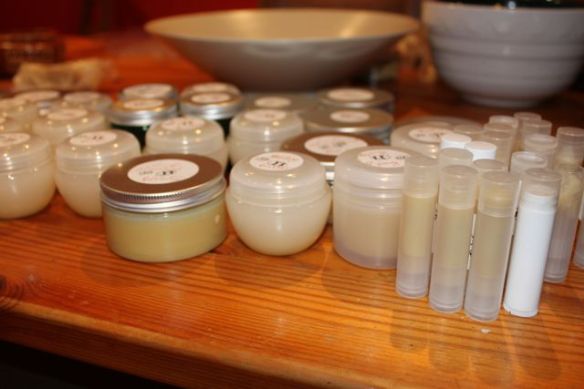
This is some of our honey soap that we tried – it worked very well, and has produced a soap that makes a nice lather. It was made in a mould imprinted with honey comb and bees. There isn’t any wax in this, but there is some honey. Beside it are some bottles of propolis tincture that Angela made by dissolving the propolis that we remove from the hive in 100% alcohol. It makes a gargle for sore throats and coughs, and can also be used in cosmetics.

Most people think of a hive as just a honey producer, but there’s plenty of other products from the hive that can be used rather than just thrown away.

Swarming time

Our bees don’t read the same books as we do. That much is clear.

Last year was pretty uneventful. We got our new bees in a nuc from Capital Bee in the spring, they built up over the summer and filled a couple of honey supers by the end of the summer. Sadly they didn’t make it through the winter, probably due to a combination of causes, but apart from that, the year was pretty straight forward. No swarming, no queen cells.

This year has been somewhat different!

IMG_4644

Shortly before the completion of our bailey comb change (there were still a few bees to emerge out below the queen excluder), we found two queen cups in the top box. We were used to finding queen cups, and had seen many last year, but this time on closer inspection, we found that they both had eggs in them.

These were the beginnings of new queens and the signs of imminent swarming. As our hive is located in a residential area, swarming is undesirable – as well as losing our bees, a swarm in someone’s garden would be a nuisance, so we needed to implement a swarm control measure.

IMG_4680

This is a picture of the queen cup, further built out by the bees, into a more distinctive queen cell.IMG_4650

Our chosen method of artificial swarming was using the Snelgrove board. This is a board with a hole in it covered with wire mesh, and 3 pairs of doors. This board allows a colony to be split with one hive below the board and the other above. The mesh allows the smells of the two hives to mix, so that they don’t fight when you open and close the various doors at different stages in the process, which transfers bees from the top box into the bottom.

The advantage of this method is that you only need a single floor and roof, and don’t have to move hives around, as with a ‘traditional’ artificial swarm.

The basic principle of artificial swarming is that you want to split the colony into two:

  • The old queen with the flying (older) bees on fresh foundation, in their original position
  • The brood, queen cells and nurse (young) bees in a new position

Any flying bees will return to where they previously knew their hive was, and hence will return back to the original hive location – this is why the old queen and flying bees need to be in their original position, even though this half represents the ‘swarm’ that would normally leave the hive to find a new location. As these bees are the foraging bees, they will be the honey producing part of the colony, and therefore it is sensible to give them a super.

In the picture above then, we have the brood box with old queen and flying bees, then a super, then the Snelgrove board, with one of the ‘doors’ open at the side, followed by another brood box with queen cells and brood, and nurse bees to raise the queen cells.

IMG_4684

This shows the mesh in the Snelgrove Board floor, allowing contact between the bees from the two hives.

So far so good.

On a subsequent inspection a week later, I found a strange looking capped cell on another frame. It didn’t look like a classic queen cell – it was more horizontal than vertical, but also didn’t look quite like a drone cell. I decided to open it up, and a bee walked out of it. We watched it for a bit and decided it definitely wasn’t a drone and that she really looked like a queen.

It is not usual to mark a virgin queen, but I decided to mark her yellow so that we could track what happened to her given her unusual arrival – which turned out to be an inspired decision. We named her Virginia, the virgin queen.

IMG_4690


A few days later though, I got an email from someone in a neighbouring house, who happened to have been a shareholder in our scheme last year, saying that she had a swarm of bees in her garden. I couldn’t get there that evening, but the next morning Ken and I went over, and sure enough, there they were clustered in their apple tree. It’s not a very good picture – I must remember to take my camera, rather than just my iPod, to a swarm collection next time.

IMG_0118

As it was still pretty early, they were clustered quite tightly and not very active, so a quick cut to the branch they were on, the cluster fairly neatly dropped into the skep Ken was holding below. I upturned the skep onto a sheet, and waited for a bit to see if they would stay put. They seemed to be settled, so I wrapped them up in the sheet, ready to take away. Ken then looked down onto his jacket sleeve, and said ‘this bee has a dot on her’. There she was, on his sleeve – Virginia. If we hadn’t marked her, there’s no way he would have noticed her. So I picked her up, popped her into the skep and hoped for the best!

We walked them back around the corner, contained in the skep and wrapped up in a sheet, back to the orchard. After leaving them to settle in the skep for an hour or so, Angela and I transferred them into their new home – a 6 frame nuc box with fresh frames and foundation, and hoped for the best.

IMG_0120


Fortunately, they settled into their new home very happily, and two weeks later we found eggs.

IMG_4718

Having established that she was mated and laying, we marked her red, the correct colour for 2013. Here she is, and if you look closely you can see the eggs in the fresh new white cells.IMG_4745

Here she is on the day of her birth, a virgin queen, and 21 days later once mated and laying, and the yellow dot covered (mostly!) by a red(ish) dot. Her abdomen seems to be wider, although not noticeably longer, and she is much less furry than when born.Queenie So why did they swarm?

In theory, the new queen should have emerged in the top box above the Snelgrove board and started to raise her colony there. Instead, she left with around half the bees from the top box, but leaving behind no queen cells, and therefore a hopelessly queenless colony.

I think probably it was because of the mesh in the Snelgrove board. Presumably the queen substance of the original queen in the hive below the board was enough to give the top colony the belief that they were still queen-right, so the virgin queen left as a cast. In talking to others subsequently, a single super might not be enough separation between the two colonies, and perhaps two supers between them are needed.

I think this theory is borne out by what happened subsequently. Given the fact that the swarm had issued, we were not sure whether the top box had a queen in it or not, so we gave it a test frame of eggs. The idea being that if they are queen-right, they will just treat it as brood, but if they are queenless, they will raise emergency queen cells from some of the eggs.

They ignored the frame – no queen cells. But still there was no sign of a laying queen, so we tried another test frame of eggs two weeks later, and moved them onto a new stand. Lo and behold they drew out a number of queen cells, indicating that they had in fact been queenless. So it seems that they were getting enough queen substance from the lower hive to make them think they were queen-right.

This seems to be a distinct disadvantage of using the Snelgrove Board, but I’m willing to continue to experiment with it, maybe with greater separation between the two colonies or with a partial or full blockage of the mesh. I do like the fact that it doesn’t need a new floor or roof, and you could combine the two colonies at a later stage if you didn’t want increase. And also that the opening and closing of doors is a lot easier than moving hives about, which you would normally do as part of an artificial swarm to reduce the population of flying bees in the hive with queen cells, which should minimise the risk of a cast issuing (although I think probably many people ignore that part of it).

We’ve certainly learnt a lot from our bees this year, although I’m glad this all happened in our first year than our second.

A new beginning

The great thing about being part of a local association is that people are there to help you out when you need something.

And so it was with our new bees. When we told people that we had lost our colony over winter, and were looking for some new bees to get started again, Ian, one of the association members, very kindly offered one of his hives, as he had got 6 hives and 6 nucs through the winter, and this was more than he needed.

On a fine April day, he dropped around the hive of bees, and we welcomed them to their new home. IMG_4594

Without too much trouble, we found the queen, and named her Rose, after Rose Gardens, where our Community Garden is located (although not where our bees are). After Ian had left, he sent a text saying ‘I forgot to say, she’s marked white, but she’s a 2012 queen’. According to standard convention, white is used for years ending in 1 and 6, and yellow would be used for years ending in 2 and 7.

It was great to have some bees back on the site again.IMG_4596

As it was getting a bit late in the year for a shook swarm, we decided to undertake a bailey comb change, to provide them fresh comb in the brood nest. Pests and diseases can build up in the brood comb, and so regular (annual) comb changing is encouraged.IMG_4604Here we have the brood box that they came in (the green one), with a second brood box on top. In the bottom brood box, they are confined to 6 frames with the use of a dummy board, and 6 frames of foundation sit above this in the top box, also confined by a dummy board.

The bees will draw out the new foundation, and with space limited for laying in the bottom, the queen will move up to the top box and start laying there. Once she starts to do this, we will make sure she is in the top box, and put a queen excluder between the two. The brood from the bottom box will emerge over the next 21 days (and the queen excluder prevents any more eggs being laid there), and can then be removed.

This is a slightly ‘gentler’ way of changing combs than a shook swarm, but also does not result in a brood break like a shook swarm does, and is therefore less effective a knocking back varroa.

The loss of our colony

At the end of Summer 2012, we were a bit worried about our varroa levels. We applied Apiguard (thymol) after removing the honey supers, but even after finishing the treatment, we saw phoretic mites (mites on the back of adult bees) and some deformed wing virus (a virus transmitted by varroa).

After talking to some of the experienced beekeepers at the local association, we discovered that we probably had not applied the Apiguard close enough to the brood nest, and we also found that we hadn’t sealed up the hive sufficiently at the bottom, so perhaps the treatment hadn’t been as effective as it should have been.

What to do? After some discussion and mulling it over, we decided to repeat the treatment, even though it was getting late in the season. We figured we didn’t have much to lose. The varroa load seamed to be so heavy that we risked losing the bees over the winter anyway. Late summer is such a criticial time, as it is when the bees are being born that will need to overwinter. These bees will live for about 6 months. Any shortening of their lives as a result of diseases and viruses transmitted by the varroa mites can mean that the colony does not survive the winter because not enough of the winter bees live for long enough to be replaced by their spring sisters.

IMG_4491

The second time we made sure that the hive bottom was well sealed up so that the thymol fumes would stay in the hive.

Sadly, as is evident from the title of the post, our colony didn’t make it through the winter. They were still alive when we treated with oxalic acid in December, but already by that point very small in number.

IMG_4479

This is the last photo of queen Gilla, and even in this photo the mite load is evident – the bee at the bottom left of the photo has a mite on her back.

By late January/early February, it seemed evident that the colony was not faring well. There was little, if any any, sign of life, no flying, and very little debris on the monitoring board when we put it in.
IMG_4558When we opened the colony in March, we found the poor, dead colony and queen. They had formed two separate clusters, heads into cells, close together and despite having fondant and other stores, they seemed to have starved. This is known as isolation starvation, where the cluster gets stranded from the stores, and it is too cold for the cluster to break for them to move to the rest of the stores.

There were also signs of dystentry on the frames, as can be seen on the photo above.

It’s hard to be conclusive as to the reason that they died. I suspect it was the combination of a number of factors. High varroa load, weakened colony in terms of numbers and probably health, and cold weather stranding the small (and probably unviable) cluster from its stores.

The BBKA winter survival survey indicated losses of more than 30% in England this winter, so we were not alone. But with only one colony, it’s all or nothing. A sad way to end the year, but we’ve learnt a lot, and hopefully we can put these skills and knowledge to better use in the upcoming season.

Honey and the honey show

In London, the main honey flow is in July, and with reasonable conditions it should be possible to remove a honey crop in early August. In the countryside there will also be a spring flow, such as oilseed rape, but we don’t get that here.

Our bees have done pretty well, and mostly filled two super boxes full of honey. We went through the boxes and found the frames that were pretty much all capped honey – the wax cappings over the cells indicate that it is ‘ripe’ honey, having sufficiently low water content and therefore stable and not liable to ferment.

We set aside the frames that weren’t so full for returning to the bees – it is important that they still have enough stores to get them through the winter, and it is always a tricky balance as to how much to take and how much to leave behind.

We removed the wax cappings (with the yellow uncapping fork!) to expose the honey.

IMG_4217

We then set about spinning the honey out of the frames using an extractor borrowed from our association. What an aroma!

IMG_4198

As the honey started to flow from the tank, we ran it through a coarse sieve and then a fine sieve into the honey bucket, to remove bits of wax and the odd bees leg! We left it to stand in the honey bucket for 24 hours for all the bubbles to rise to the surface before putting the honey into jars.

IMG_4236

Still a few air bubbles in it, but we think it looks pretty good!IMG_4239 Nanda affixes our labels to finish.IMG_4244

IMG_4245

Encouraged by our local association, we decided to enter our honey into the National Honey Show – why not? We entered into the Middlesex class for 2 identical jars of honey, in the medium category.

Our association has the required grading glasses, which you can use to determine whether your honey is ‘light’, ‘medium’ or ‘dark’. Ours was right on the boundary between medium and dark so I elected to enter it in medium.

The word ‘identical’ is also apparently key. The jars have to be identical, reportedly even any mark printed into them during the glass-making process, the labels have to be placed identically, the right distance from the bottom of the jar.

Alas, we did not win a prize. Was it not considered to be medium? Were the jars not sufficiently identical? Did they even taste the honey? (Many are disqualified before the honey is even tasted). We shall never know. Still, it was a fun experience to enter, and attending we got to see some great exhibits, listen to some interesting lectures and attend some useful workshops. All in all a good way to end the beekeeping year.IMG_4515

Drone culling

OK, so I am writing this considerably after the fact, having got a long way behind in blogging.

Drone culling is seen as a method of varroa monitoring and control, as part of Integrated Pest Management. Having done a fair bit of reading since, I am now not so sure about drone suppression and culling. I am looking into horizontal top-bar hive beekeeping, and proponents of this form of beekeeping (which doesn’t use foundation, and therefore allows the bees to develop worker and drone brood as they wish) believe that widespread suppression of drones (through use of worker foundation and the practice of drone culling) limits the availability of drones and therefore the ability for queens to get successfully mated.

An article printed in the Beekeepers Quarterly reported that queens mated with fewer than seven drones were much less likely to overwinter successfully compared with queens mated with more than seven drones. Polyandry (female mating with multiple males) ensures genetic diversity within a single colony, improving its chances of coping with different conditions.

We certainly have seen difficulty in getting queens successfully mated over the last year. The weather has not helped, but I can’t help but wonder whether a lack of drones might also be a contributing factor.

The more you read, the more you learn and the more differing opinions you encounter. Drones are in the capped stage (pupation) for longer, which is why varroa are thought to prefer drone brood – it gives them another reproductive cycle, which means more mites. So advocates of drone brood culling will warn that allowing drone brood means that you are creating a varroa factory. Which also has some logic.

So to cull or not to cull? Both have sensible arguments.

Of course what we really seek is a bee adapted to varroa that is sufficiently hygienic to keep mite numbers to acceptable levels. Some claim to have reached this state through locally bred and adapted bees. This can take time and tolerance of losses to ensure only survival of the fittest. In a densely hived area such as London, it will be difficult to achieve a truly local bee given the extent of importation that surrounds us. So far though, we’ve raised all our own queens.

Anyway, whether or not it was the right thing to do, we did carry out drone culling through the season. I’m a believer in giving things a go, and learning from them.

I warn you, it can be a bit gross.

Image


The wild comb beneath the super frame was all built and laid as drone brood, as per the text books. So we removed this comb, and then uncapped it with the uncapping fork. The red one. The red fork is for culling, the yellow one is for honey.

Image

These are the pupal form of the bee, a few days before it is ready to emerge. You are meant to do it at the ‘pink eye’ stage, so this is probably slightly early.

The varroa mite shows up very clearly against the white pupa.

Image

A one in ten infestation is said to be high, and that is about what we had, indicating that an autumn treatment of Apiguard (thymol) would be advisable.

Image

Pink-eye pupal stage bee with varroa mite on it.


Visitors get up close and personal with our bees

We were lucky with the weather for our second open day – we managed to pick a sunny gap between some rather heavy showers to open up the hive and check out our bees.

They continue to do well, with a good healthy brood nest, and a good amount of stores up in the honey supers. Whether there is enough for us to take a crop of honey off will depend on their ability to take advantage of the main flow of nectar over the next month or so.

Below, Kathy checks a play cup for an egg.

Last week we put a partly drawn shallow frame into the brood box to replace a broken frame we had removed, and they have been busy girls over the past week.

This is what it looked like last week….

And this is what they have done in a week….

This is a method of varroa control. What they have done (by the book!) is drawn out the foundation within the wooden frame into worker cells (because that was how the foundation is imprinted), and then built ‘wild’ or ‘free’ comb below the frame, and you can see from the picture that this has larger cells than the worker comb. This is drone comb, and the queen will lay unfertilised eggs, which will turn into drones (males), which are larger than their female counterparts. Varroa mites will preferentially inhabit drone cells because of their longer pupation period (which gives the varroa longer to breed). Gilla had not started laying in these cells yet, but she should very soon, and by next week there should be young larvae in the cells.

A week later, the cells will be capped and we can then remove all of the drone comb, complete with larvae and, more critically, lots of varroa. We’ll freeze it to kill everything. The drones are good for nothing (they only exist to mate with a queen, they don’t do any work or collect nectar), so apart from the energy that has been used to build the comb and make the bees, we have lost very little… except for a lot of varroa… at least that’s the plan.

As well as being a method of controlling the numbers of varroa, it is also a way of assessing the level of infestation by uncapping the brood and counting the numbers of varroa – which is a bit messy, but it will help us to assess whether we need to take further control measures.

Come and visit our hive

Next weekend (Sunday 24th of June, 1pm) we are having an open day at the hive – your chance to visit, put on a bee suit and get up close and personal with our bees!

If you are interested in coming along, please contact us at ealingcommunitygarden@gmail.com so we can give you details of how to find us, what to wear etc.

We ask for a gold coin donation – any money raised is put back into the project to provide training of the beekeepers and equipment.

Time to start culling some drones

We started this week, as we always do, by lighting the smoker. A few puffs of smoke into the hive will make the bees think there is a fire, and that they might all need to leave. In preparation, they fill themselves up on honey, which makes them calmer, and can also get them out of the way. Beekeepers will generally have a smoker to hand, and the judicious use of smoke will help to make the inspection go smoothly. That is if you can keep it lit!

A few weeks ago, the lugs on one of our frames broke, so we needed to get rid of the frame, but it was covered in brood. Not wanting to lose all those potential bees, we decided to keep it in the hive, but we moved it to the edge of the hive, and on the other side of the dummy board, to prevent the queen from laying new eggs in it. The cunning plan worked, and 3 weeks later, the last of the brood were emerging, some helped into the world by Kathy!

Because it has been fairly cool, and because the frame was away from the middle of the brood cluster, some bees seem to have died from being chilled, but most of them seem to have made it.

The girls seem to be doing well, despite the mixed weather, and the brood frames have plenty of bees on them.

One of the threats (to the beekeeper) of a strong colony is that they find themselves so strong that they can split the colony in two, a process known as swarming, and the natural means of reproducing the ‘superorganism’. We keep a strong lookout for signs of potential swarming each week by checking for queen cells. We have found plenty of ‘play cups’, which are a bit like practice queen cells, over the last few weeks, but this week we found the first that was getting closer to a queen cell. There was no egg in it, so we can relax… at least for the next week.

The brood seems to be healthy, and the picture below shows nice capped worker brood, as well as nice, white, c-shaped larvae, nicely segmented – all signs of good health. And to the top right you can see pollen stored. They seem to have stored loads of pollen.

Although the brood looks healthy, one thing we need to remain constantly vigilant for is varroa. The mite is present in all hives throughout the UK (and much of the world), and is tolerated at low levels, but carries disease, and at high levels of infestation can destroy a colony, mainly as a result of the diseases that it transfers to the bees.

With widespread resistance to pyrethroids in the UK (through misuse), we have lost what used to be a very effective measure against varroa, and so have to rely on a series of small measures to keep the numbers to a tolerable level.

One of these is drone culling, which involves encouraging the hive to create drones (male bees), and then removing and killing the drone brood when it is capped. Because mites prefer drone brood (as it is capped for longer, and therefore gives the mite longer to reproduce), lots of the mites will be in the drone brood, and so if you remove and destroy it, you have destroyed the mites.

And so, we have replaced our broken frame with a shallower ‘super’ frame from the honey super, which is partly drawn out. The bees should build ‘wild’ comb below this, and it will be drone comb. We can then easily remove it once it has been capped.

We shall see how it goes…

A strong colony is developing

Every time we open up the hive we never know quite what we are going to see. And every time we see different things and learn something new.

We were concerned when we saw the frame below that we might have chalk brood when we saw the white pupa. Chalk brood is a disease that turns the larvae into mummified, ‘chalk’ like substance. But then we realised that we had just probably bumped the cappings off some drone brood as we pulled the frame from the hive, and exposed the pupating larvae.

One of the larvae had a varroa mite on it – they are easier to see against the white larvae, and they prefer drone brood because of its longer pupation period (which gives the varroa mite longer to reproduce).

The undertaker bees immediately got to work removing the remaining pupa.

They have plenty of pollen stores, in a beautiful mosaic pattern around the edge of the frames. The variety of colours indicates they have been foraging from a range of plants, so they will produce a wonderful multifloral honey, typical of urban honies.

In the picture below, you can see a drone larva, just about to be capped over ready to pupate. The nice, white, segmented larva looks nice and healthy.

We also saw a number of bees emerging. You can just see a head poking out in the middle of the picture below, and an antenna poking through just above it. The newly emerged bees are slightly lighter in colour, and tend to be all fluffy.

The first honey super is getting nicely filled up. The nectar that is brought in by the bees is emptied from their honey stomachs into the cells, and then they evaporate the water from it, until it is about 80% sugar – at this concentration it is now ‘honey’ rather than ‘nectar’ and is stable so it won’t ferment. At this point the bees will build a thin wax capping over each cell to safely store the honey.

We were perhaps a little optimistic giving them a second box of super frames last week, as they haven’t started to draw them out at all – but we know the space is there when they need it, and depending on the weather and availability of forage, they might want to move into it before too long.

Bees are constantly in contact with one another, and as a result the queen’s pheromone is spread throughout the colony – their signal that all is OK. The bees in the picture below at the hive entrance are probably passing honey from one to the other, and at the same time will be passing a bit of pheromone to one another.